Monday, December 5, 2011

CineMate® GS Series II digital home theater speaker system


I thought I just had to write about this system as I just recently bought a house and was looking for a solution so not to run speaker wire or install in-wall speakers, while still getting the full surround experience. At first I was skeptical as this was nothing used to risking my money on; I've always been an avid user of 5.1 and 7.1 systems that actually came with a physical receiver. So let me just say, TRUST ME, this is awesome!

Let me explain why I love my Bose Cinemate GS digital home theater speaker system:
It's a 2.1-channel speaker system with compact speakers with incredible digital acoustic performance. It's available with Gemstone speakers and universal remote or Articulated Array speakers and simplified, four-button remote. I happen to own the Articulated Array system, even though you don't get a universal remote, who cares, my rogers remote does it all. And these speakers sounded WAY better than the Gemstone's in my opinion when I was purchasing them. And this is the less expensive model!?

The Bose® CineMate II speaker system is the easiest way to enjoy Bose 2.1-channel home theater performance and bring out the full audio potential of your HDTV. Proprietary TrueSpace® technology enables two compact speakers and an Acoustimass® module (your subwoofer) which really helps to simulate the acoustic audio properties that a 5.1 or 7.1 system create. The system easily connects directly to your TV with a single optical cable, which is nice because it will automatically follow the inputs on your HDTV. And with no rear speakers, there's no wiring to the back of your room!

If you are looking for a home theater upgrade to complement your HDTV, The CineMate II system delivers with sound and style. You get two elegant speakers that sit on either side of your TV, and the center width that both create is truly outstanding! In my opinion I much prefer the "Center" dialogue clarity that the Cinemate 2.1 system produces, over having an actual center speaker. These speakers sound SO much better than your TV speakers alone, that is a given.

The Acoustimass module (subwoofer) provides the low frequencies that make the CineMate® GS Series II so compelling. It includes a dedicated bass control knob for setting it to your volume preference. Together, the speakers and Acoustimass module provide full depth and clarity for your choice of movies, gaming and especially music, too.

Setting up a CineMate II system is a quick exercise, with only a few wires to connect. It hooks up directly to your TV with minimal—if any—disruption to existing component connections. A small interface module houses your audio input from the TV and displays on/off status for your system. And it's all controlled with a programmable universal remote that works seamlessly with most video components attached to your television.

I would recommend this system to everyone, which is why I'm writing about it. I'm so happy that we bought this, it's a great space saver, looks very elegant, and sound F&*king amazing!! You can find the CineMate® GS Series II digital home theater at Future Shop and Best Buy too!
Wednesday, January 20, 2010

M-Audio Izotope RX


M-Audio Izotope RX is a very powerful Noise reduction tool. It is able to remove pops, clicks, hums, background noise, clipping, and can even function as a spectral repair tool, when parts of a wave file are missing.

I've only been using Izotope RX for about 2 months now, and it is a tool that every sound editor should have! And if you can take the time to learn how to use it,
you will be well on your way to audio repairing heaven!

There are many tutorials out there, including ones on YouTube that will demonstrate
how to use the program, and it is in your best interest to learn as much
as possible when using RX, because as much as it is powerful, it is also destructive, so beware!

Izotope RX can perform all of the above functions to repair your audio, but it is
even more flexible, as you can preview in real time what your audio will sound like, capture your settings along the way so you can easily go back to a setting that worked
better etc. By using 3 Algorithms- A (Realtime),B, C (Offline), the user can choose to yield better results (slower processing) or by using B or C, or faster processing to get through larger amounts of content in a shorter time period (A). I find that no matter which Algorithm you use though, you will always have to tweek the amount of Noise Reduction and Smoothing to lessen the artifacts created on the original audio.

Izotope RX performs really well, as a declipper, hum remover, and spectral repair tool as well. The user is able to zoom into the spectrogram, and select only a desired frequency band, and isolate that sound for further removal. This is quite convenient when certain noises happen in a higher or lower frequency band, and the user is not forced to affect the original audio in all frequencies.

If you have a waveform which is missing information, RX can also use the information around the selected area to rebuild a natural filler in the audio to make it flow together. Now, this is shear magic!

If you are an editor and are constantly faced with Background Noise, hum from electrical grounding issues, or need to clean up an old recording, Iztope RX is for you!

Get it at www.Izotope.com

Tuesday, October 13, 2009

Roland Jazz Chorus 120


The Roland Jazz Chorus 120 is one of the cleanest sounding solid state amplifiers to ever be built. Although it is used mainly for guitar, it has also been adopted by keyboard players looking for a decent amp to plug into. There are many versions that were built over the years, with different electronic schematics attached, but the heart of amp is the sound. The on board Chorus/Vibrato switch enables the player to dive into some of the most rich and clean sounding Chorus and Vibrato that is incomparable to most guitar pedals.

The Roland Jazz Chorus 120 has two separately amplified channels on board both with EQ built in. Each channel has a high and low input, as well as a bright switch. The second channel has Distortion on it, which is by far, not a convincing distortion at all, but its fun to try out non the less! The Reverb and Chorus pots are also on this channel. The Reverb that the Roland Jazz Chorus 120 puts out, is very spacious and a really nice touch to many different guitar sounds, but I tend to use it about 35-40% most of the time. Because the Roland Jazz Chorus 120 uses 2 amp's internally, the True Stereo Chorus and Vibrato really shines on this amp. You can even get a Leslie whirling speaker kind-of-sound when you crank up the vibrato and play with the depth and speed controls.

The amp is made up of 2-60W amplifiers and has 2-12" speakers side by side, and believe me, the Roland Jazz Chorus 120 is REALLY loud, especially when you break into the 6/10 range on the volume. I've never pushed mine to 10, who would? On Stage, I only put it on 3/10 and thats loud enough!

I USUALLY, however, push alot of Distortion through this amp, using my ProCo Vintage Rat - check my blog on that below...
And the amp sound even better with this distortion, probably because it tends not to break up the sound as much as other amps. Bless that clean sound!!

This amp is really great because it has weight to it, and it comes with swivel casters on the bottom for ease of transportation, and boy am I happy to have those ! It really is a heavy amp, but made durable, with lots of bolts for reinforcement, but much lighter than some alternatives out there for sure.

It's been rumored that its history is an often seen companion to a Marshall on stage supplying the clean sounds, the reputation of this amp is tops in its field. 80's King Crimson concert had array of JC-120s stretching across the stage! Joni Mitchell-approved. Also a favorite of the late Roy Buchanon. James Hetfield also uses it!

I've been tempted to move to a stack of some sort for a while, but I keep coming back to the original and beautiful sound of this kick ass amp! I love you Roland!

Monday, October 5, 2009

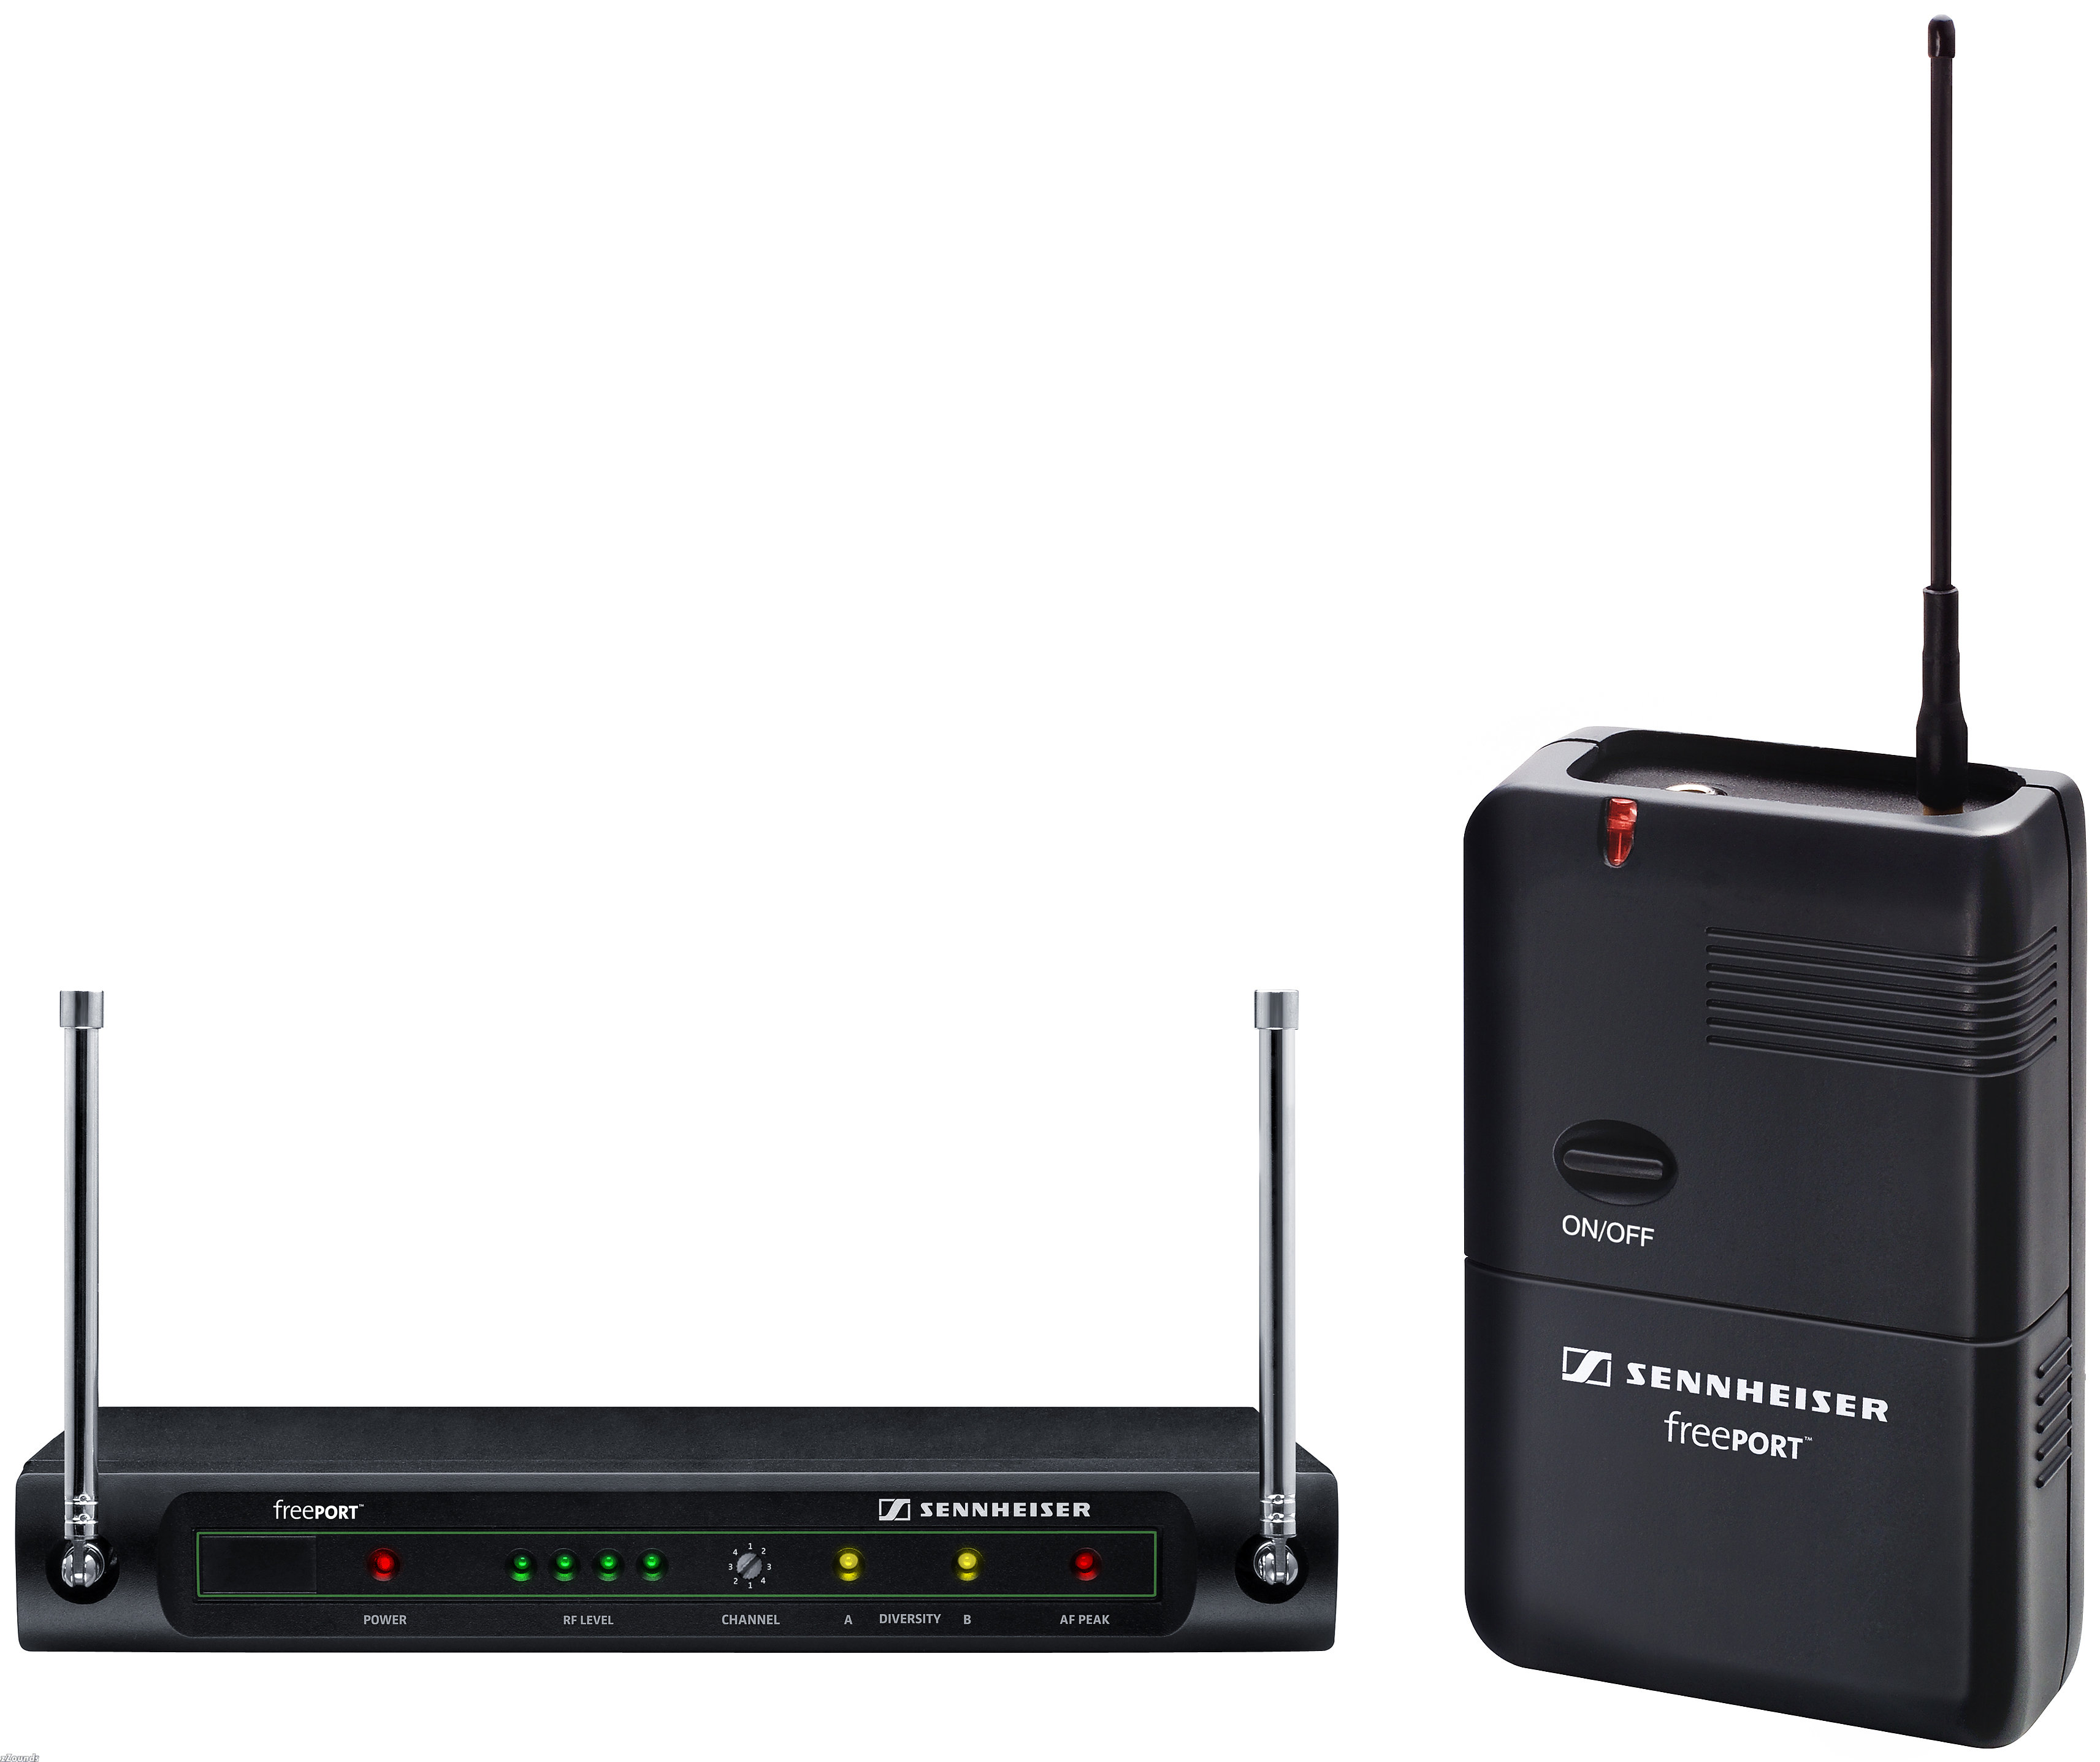
Sennheiser FreePort Instrument Set UHF Wireless System


The Sennheiser FreePort Instrument Set UHF Wireless System is the best solution for under $200 that any serious musician should have. It has four selectable channels to choose from to optimize and protect your sound from any other wireless interference. It has diversity technology for highest reception quality and Dynamic processor for crystal-clear sound.

The system is quite small; weighing in at a mere 570g for the receiver and 9g for the transmitter pack. Dimensions are 35 x 213 x 98 mm for the reciever, and 60x100x30mm with the clip.

Some may argue that the transmitter is made of plastic housing, therefore making it less robust, but the truth is, and this goes for all gear, if you take care of your gear, it will last. Don't expect the gear to take care of itself!

I also feel that when I use this system, the digital processor really cleans up the instrument sound and gives it a slight mid range boost, really nice for guitars!

If you are looking for a wireless system, look no further, grab one of these!
Tell them Mike sent you! -- I Can't promise you a better deal though. =o)

Other useful Technical specs:

The Frequency Response is: 80-16.000 Hz
Signal-to-Noise Ratio: 95 dB(A)
THD, Total Harmonic Distortion: < 1%
Audio Output Level (Balanced): XLR, +16 dBu
Audio Output Level (Unbalanced): Jack, +10 dBu
Power Supply: 12 VDC nom

Tuesday, September 8, 2009

Dean Guitars - Evo Special Select


Dean guitars are unquestionably the best guitars for the money. I bought the EVO Special Select model about 3 years ago in 2006, and just love it to death. It is an edition which was my second choice to another Dean at the time, that had just been discontinued. The day it arrived at the store - I actually skipped out on class, and with a terrible fever and cold, I trekked through snow up to my knees, about an hour away, to go pick it up as soon as it had arrived!

Yes, people say Dean guitars are made cheaper, but don't believe them. The guitars play amazingly, and have solid hardware which makes them beat any other competition in the same price range. I'm an avid Fender Stratocaster player, so take this advice!

I was skeptical, having only played a few other Dean models and not knowing what to expect, but this guitar is definitely one of my favorites to play. Here's why:

- Arched Maple Top
- Mahogany Body
- 3 Star Arched Figured Maple Top
- 24-5/8" Scale & 1-5/8" Nut
- Grover Tuners
- Nickel Hardware
- Zebra Pickups
- Tune-O-Matic Bridge
- Set Mahogany Neck
- Wood Binding
- Rosewood Fingerboard
- MOP Hourglass Inlays
- 22 Frets
- Push/Pull Potentiometers


All of these features are amazing, but I really like having the Push/Pull pots on both pickups which can give you endless sound combination's from a single coil to a Humbucker or a little of each. You can fine tune your sound to whatever works for you!

The Grover tuners are just great, and they always keep the guitar in tune perfectly. The overall sound of the guitar is really punchy and has a lot of bite to it, so for heavy distortion-type playing its ridiculous! For clean tone, I'd have to say that I am really happy with the sound it has. Again, by using the Push/Pull pots, you can really fine tune that clean tone to whatever your heart desires! The guitar is very good at cutting through the mix and is very clean sounding all round. If you like to really move around the fret board quickly, this is the guitar for you, as the action is just amazing, while there is virtually no fret buzz anywhere!


The guitar is fairly light weight, and is solid body, so you really have to make sure to store it in the right temperatures to prevent it from warping.

This guitar also has a sweet looking inlay setup across the fretboard and it truly is beautiful to look at. I got my Evo in the Quilt Vintage Sunburst finish; like the picture above.


If you are looking to buy a Dean guitar, and live in Toronto, make sure to check out Rogers Music Center. Jimmi has alot of hookups and I have seen the best Dean selection through his music store. Here's to you Jimmi!

I'll be writing soon about my Dean Baby V - Also purchased at Rogers!
Once a Dean, always a Dean.

Monday, August 31, 2009

Zakk Wylde ZW45 Signature Wah Pedal


The Dunlop Zakk Wylde ZW45 Signature Wah is one of the coolest sounding Wah's out there.
The main reason I picked up one of these is because I never liked the lack of sweep I got out of the standard Dunlop Crybaby. This one has got a bigger Wah sound to it, and when you press it all the way forward, the high end cuts right through and you can really make your guitar wail.

So far, it has also proven to be more reliable than the Original Crybaby, although all of the rubber feet have come off the screws at the bottom. Not the biggest deal, and totally fixable, but I can't help but feel annoyed by it.


Thanks to Jimmi at Rogers Music Centre in Toronto, he said "Hey why don't you give this a try?". That's all it took, and after comparing it to a few other brands, I was sold!

This pedal comes with an adjustable torque clutch that allows the user
to control the amount of resistance the rocker has to being moved. The
adjustment is located under the rocker at the heel of the pedal. By
placing the rocker toe down and looking under the rocker heel, you
can see an adjustment allen head screw. By turning this screw
clockwise you can increase the rocker torque and conversely,
counterclockwise decreases the rocker torque.

ZW-45 TECHNICAL SPECIFICATIONS:
Filter Parameter
Low Pass ---250Hz - 350Hz
High Pass ---1.4kHz –2.4kHz
Input Impedance ---1MEG
Output Impedance ---10K
Maximum Input Level ----9dBV @ Filter’s Center Frequency
Maximum Output Level ---+6dBV
Maximum Gain (Toe Down) --- 17dB
Maximum Gain (Heel Down) ---17dB
S/N (Heel Down) --- >100dBV
S/N (Toe Down) --- >90dBV
Power Requirements --- 900uA @9V DC

Friday, August 28, 2009

ProCo Vintage Rat Distortion Stomp Box


It's that time again! This time I'm letting everyone know about the distortion I use for my guitar rig. It's pretty basic actually but I use the ProCo Vintage Rat stomp box.
This model has been discontinued, so in a sense I feel lucky. I've tried some of the other models but they all vary and I still like mine the best.

Basically, it has 3 knobs - Distortion, Filter, Volume. Pretty simple I know, but really this is all this pedal needs to sound great!

I usually set my distortion at about 11 o'clock which gives me a light, but crunchy enough sound for most of Proxy Set songs, but sometimes I'll juice it when I'm feeling dangerous or drunk at a gig =o)

The filter is really cool because it sweeps from a very open and bright distortion all the way to a high-cut-low pass sound. Very cool for Queens of the Stone Age guitar sounding stuff.

And the volume- well that's just a volume. BUT, this pedal has tons of gain and can really cut through the mix really well! Try it out, that is, if you can get your hands on one!

Monday, August 24, 2009

Sennheiser e902


The Sennheiser e902 has to be the best sounding large diaphragm microphone I have used and heard in a long time. I recently picked one up for around $150 used, along with it's family - e905 and e604 - also great microphones!. The attack and lows that this microphone captures are phenomenal. I have used it on a Pearl Export drum kit and on a 15" Peavey Bass cab.

I used this mic by placing it about 4 inches from the speaker and right between the middle and outer edge of the cone. (A technique that has given me some lively bass sounds.) If anyone can suggest why I shouldn't place the mic in this fashion, please let me know!

Here is the frequency response and pickup pattern of the Sennheiser e902:


Besides all of the amazing details of this Mic, the only thing I have read about it, and can see about it after now owning one, is that the clip assembly if broken looks hard to fix, or you might have to send this Mic back for repair - Not sure!

Besides this point, I love this Mic and would recommend it to anyone!


Tuesday, August 18, 2009

KRK Rokit 5 - Gen 1 vs Gen 2

KRK Rokit 5 Generation 1


KRK Rokit G5 Generation 2

It has been almost 4 years since I purchased my pair of KRK Rokit 5 G1 reference monitors. Back then I was totally hyped just to buy a decent pair of monitors, it didn't matter if they were super expensive or more affordable, but it was more important to stop trying to do my mixing on my desktop speakers...lol.
Surprisingly, the songs I mixed on my desktop speakers turned out decent, considering they were a Harman Kardon set with a sub, so I could at least hear what was happening in the low end.

It was time though to work seriously, and this, my friends, is where all my money started flying out the window! =o) Let me just say though, that these monitors really outperformed themselves from my very first mixes until the ones I am currently doing now. So much that when it my studio at work needed a pair of reference monitors, they were my first choice and also because they were within budget.

So that day I went out to Long & Mcquade and bought a second pair of Rokit 5's. I was expecting to buy the 2nd generation (G2) which have a slightly different look and design. And I have been comparing both the G1 and G2's for the last 16 Months, doing A/B tests with the same Material and working in the same room to mix in and here's what I have to say, and later I will actually compare specs as per KRK:

It seems to me that the G2 of KRK monitors have a slightly more colored sound, but not the kind of color that would take away from the original sound of the source material, but the speakers exhibit a sort of clarity in the mid range that the G1 do not. The low-end also seems to sound slightly different in both generations (I don't want to necessarily get into the frequency response curves to compare the two, but rather let my ear tell the story for now) as the G2 of KRK 5's sound more refined and the response feels more accurate in the low end, something I feel is a direct result of the redesign of the cabinet shape. The square shaped cabinets of the G1 of KRK 5 seem to have a slight roll off in the lower end, and that is considering that these monitors reach down to 53hz.

I've always enjoyed the clarity of tweeters on both G1 and G2 and don't have many issues with their response, but the look is slightly different on the G2 as the enclosure around the tweeter is simply shaped differently.

Now: Here's what I learned from comparing G1 vs G2 Specs:

Freq.Response
G1: 53Hz-20kHz
G2: 52Hz-20Khz

Signal to Noise (HF/LF)
G1 & G2: 82dB/90dB

T.H.D (HF/LF)
G1 & G2: .05%/.02%

Crossover Freq.
G1: 3.0KHz
G2: 45Hz
Subsonic Filter
G1:3.0KHz
G2: 45Hz.

Weight:
G1: 16 lbs
G2:13.4 lbs

KRK Key Technologies for the G2:

  • Radically curved front plate design virtually eliminates diffraction distortion
  • Waveguide design provides amazing detail and imaging
  • Front-firing port provides low freq extension without boundary coupling
  • New speaker voicing for even more accurate frequency response

SO, my ear has told me a few things on this lesson. First is that the imaging is definatly something that has been improved on the KRK G2 and this proves to be a result of their design as the curved sides eliminates diffraction distortion and this is especially true when you are monitoring on a wider plane. (If your speakers are further apart). New speaker voicing, and although the Freq. response is only 1 Hz lower in the G2, has proven to give the overall sound a better result. The front-firing ports are also really handy when mixing close to a wall, which most of us do, where lower frequency's get coupled and bass traps are needed, these ports help that issue. Cross over frequency was something I thought might have been different between the two, and therefore proving the mid range to be more present, but this would seem to be false as the cross over freq. is the same in both G1 & G2. The "mid range" improvement I am hearing is more a result of the waveguide design on the G2 which helps the speaker voicing and delivers better imaging.


At my home studio, I am still using the G1, because I like them and have gotten used to mixing on them, especially because I've been working on a project, and I wouldn't want to suddenly swap out my ref. monitors. I am definitely loving the G2 though and would recommend anyone upgrade if you are interested. For me, it comes down to what you are used to, what you can hear out of your monitor, and how to act on what you are hearing. So if you like what you are using, and are getting great mixes, then still with it. I really like KRK reference monitors though, and I havn't looked back. Most of my mixes end up being very true when I bring it to another sound system, or in a car.


What I would recommend however, is buy the KRK Powered Subwoofer. It will tell you exactly what is going on in the 20-50Hz range which is something that you and I had to learn by countless trial and error and learning how to read the monitors without a sub. You can get used to them without a sub, which I have, but it would make life a lot easier for you.


Thanks for reading, hope you enjoyed!
Mike

Tuesday, August 11, 2009

M-Audio Project Mix i/o

<!– google_ad_section_start –>


Hey bloggers! I picked up M-Audio's Project Mix i/o control surface about a year ago. At the time I was looking into a solution to providing more inputs to my Pro Tools LE system. Before I wrote any kind of review on this product, I wanted to spend a lot of time using it on various projects in order to give it a fair review. Well, if you are looking to expand the amount of inputs you have using a firewire based system, look no further. Over the course of this year, I have used this on projects ranging from full drum kit sessions, guitar/bass sessions, to vocal sessions, to round-table discussions, as well as live feeds from FOH mixers. Simply put, the best thing I love about the Projectmix i/o is that it is very portable, but it's durability is second to none. It feels really solid in general, and although the 10 bit-Automated Motorized faders feel slightly light-weighted, they also are very sensitive and responsive to touch. The Projectmix i/o has Phantom power on all 8-XLR inputs and has 8- 1/4" line level inputs as well as ADAT in/out, SPDIF, and wordclock with 4-1/4" main outputs for monitoring.

The Projectmix i/o features really shine when you are pointing and clicking all over in Pro Tools, because when it comes down to it, you have all of the necessary features to control right in front of you on this board. From simple play back/recording enabling, to soloing and muting, to a nice LCD screen which displays each track name and other useful mix-ready information not to mention the programmable rotary encoder knobs and memory locations, you will be able to do more things on this board in 1/3 of the time.

With only 8 faders, you might ask yourself, how can you control all of your tracks in Pro Tools?
Well its quite easy actually. The PM offers a bank select feature that you can scroll track-by-track, or fader-by-fader, or in groups of 8 faders, to the next set of tracks you want to work on. And all fully motorized and automated, so its fun to watch them all move and correspond to each track you pull up on the board. =o)

Need more inputs? No problem. There's also an ADAT lightpipe in/out so that you can use a single optical cable to connect another channel strip such as the M-Audio Digimax FS or many other channel strips from other companies with an ADAT out. This makes it easy to expand your inputs from 8 to 16 or 24 or as many channel strips with ADAT as you can afford ;o}

There are only a few things I would point out which I found out the hard way. The gain on the inputs on the Projectmix i/o are slightly hot, meaning that if you put a high SPL source in front of it such as a kick drum/snare/ loud guitar amp, it will clip quite easily - WITH NO GAIN. However, I've never really seen it as much of a problem as there are solutions around this. 1) Use an Attenuator, (sold by M-Audio - I think specifically for SPL sources for the PM) or 2) Back off the microphone, although not always preffered as a method, or 3) Use another channel strip with ADAT like the Digimax FS or LT which can handle higher SPL at the source without clipping.

The other things I didn't like was that the PM only has 4 outputs, no inserts or direct outs. Not my first choice, but again I learned from the perspective that I was only looking for more inputs and a really cool control surface! (no regrets, as there are options depending on how you set up your studio) The other thing is that the Master fader, does not work as a master fader. In fact it doesn't work at all. I have searched endlessly to find out why this is, but there is no real reason apart from that it probably works with other programs besides Pro Tools. I'll get to that in a second. Therefore, if you want a master fader, you have to create a master fader track in PT, then use that channel as you would any of the other 8 faders to control the master level. No biggie.

I must say that because you can use this control surface with MANY other programs, this makes it really versatile. Such programs are: Logic, Cubase, Digital Performer, Sonar, Ableton Live and can be used to control Midi through all Pro Tools systems. The Projectmix i/o is also fairly affordable when you think about all of its features and digital connectivity-coming in around $1299.99 US. I would definitely recommend this control surface to anyone interested in it, and have already found it in Post-studios who find it convenient to mix their track-intensive sessions on such a small surface and keep it all in the digital world, as it supports 44.1, 48, 88.2, 96kHz sample rates with 24 bit conversion.

Well, that's my first blog on the M-Audio Projectmix i/o. I hoped you enjoyed, and feel free to leave any comments as I probably missed information about this wonderful product!
<!– google_ad_section_end –>